
คุณกำลังพยายามหาข้อมูลเกี่ยวกับหัวข้อการหาเงินออนไลน์หรือไม่? คุณกำลังมองหาหัวข้อที่เหมาะสม PHP CRUD Tutorial with MySQL & Bootstrap 4 (Create, Read, Update, Delete) หรือไม่? ถ้าเป็นเช่นนั้นโปรดอ่านบทความนี้ทันที.
Table of Contents
PHP CRUD Tutorial with MySQL & Bootstrap 4 (Create, Read, Update, Delete) | php crud.
[button color=”primary” size=”small” link=”#” icon=”” target=”false” nofollow=”true”]ดูวิดีโอโดยละเอียดด้านล่าง[/button]
รูปภาพที่เกี่ยวข้องกับหัวข้อ php crud.

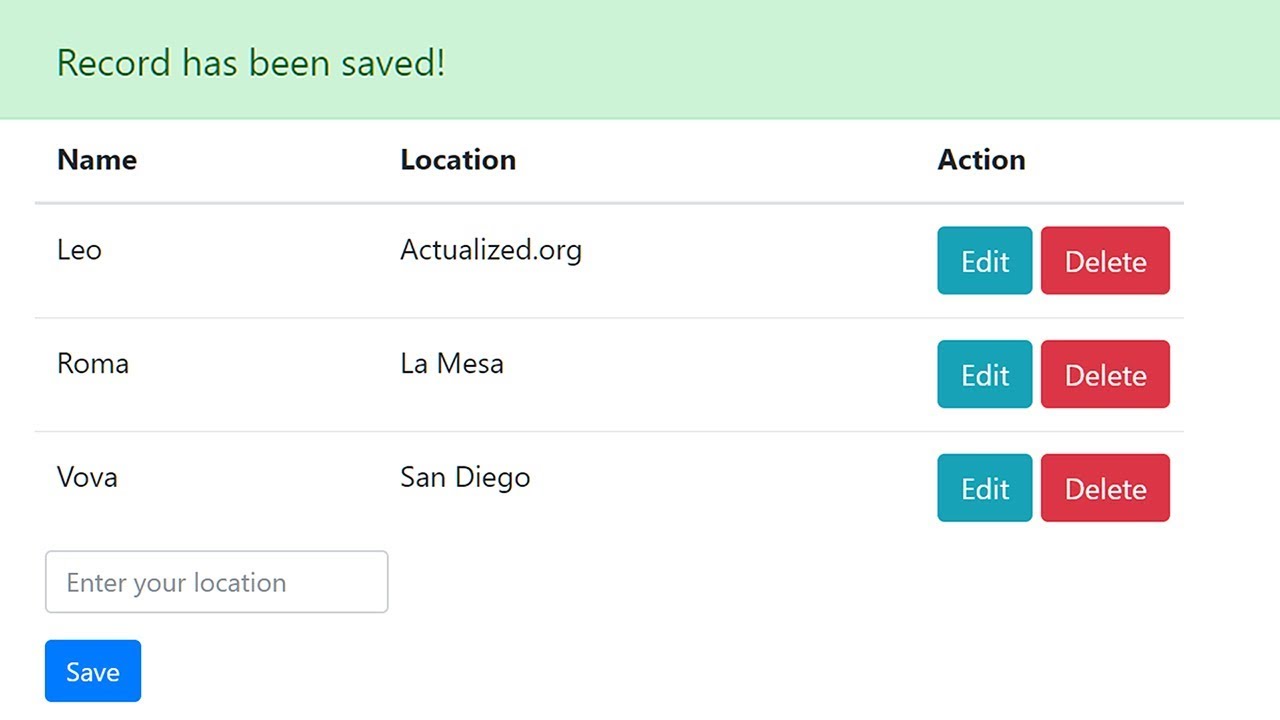
PHP CRUD Tutorial with MySQL & Bootstrap 4 (Create, Read, Update, Delete)
คุณสามารถดูข้อมูลเพิ่มเติมเกี่ยวกับ การเขียนโปรแกรมการเรียนรู้ด้วยตนเอง ง่ายที่สุด ที่นี่: ดูรายละเอียดที่นี่.
ข้อมูลที่เกี่ยวข้องกับหัวข้อ php crud.
อัปเกรดประสบการณ์การเรียนรู้ Clever Techie ของคุณ: อัปเดต! (9/13/19) คุณลักษณะและการปรับปรุงใหม่สำหรับ Clever Techie Patreons: 1. ดาวน์โหลดซอร์สโค้ดแบบเต็มพร้อมความคิดเห็นโดยละเอียด – โค้ดที่เรียนรู้และเข้าใจได้ง่าย 2. การอัปเดตไฟล์ซอร์สโค้ดรายสัปดาห์โดย Clever Techie – ทุกครั้งที่ฉันเรียนรู้สิ่งใหม่ ๆ เกี่ยวกับ หัวข้อที่ฉันจะเพิ่มลงในไฟล์ต้นฉบับและแจ้งให้คุณทราบเกี่ยวกับการอัปเดต – ติดตามเทคโนโลยีการเข้ารหัสล่าสุด 3. ไลบรารีของฟังก์ชัน Clever Techie ที่กำหนดเองพร้อมความคิดเห็นที่อธิบายและเข้าใจง่าย – ความสามารถในการเขียนโค้ดที่พุ่งสูงขึ้น โค้ดมีประสิทธิภาพมากขึ้นโดยใช้ ไลบรารี่อันชาญฉลาดของฟังก์ชันที่นำกลับมาใช้ใหม่ได้เอง 4. สรุปโค้ดไวยากรณ์ – จดจำและทบทวนโค้ดที่เรียนรู้ก่อนหน้านี้เร็วขึ้น 4. โครงสร้างไฟล์ที่จัดระเบียบ – เข้าถึงบทเรียน Clever Techie ทั้งหมด ซอร์สโค้ด กราฟิก ไดอะแกรม และแผ่นโกงจากพื้นที่ทำงานเดียว – ไม่ต้องค้นหาอีกต่อไป . สำหรับเนื้อหาที่ครอบคลุมก่อนหน้านี้และซอร์สโค้ด – ประหยัดเวลาและความพยายามอย่างมาก 5. โครงร่างของหัวข้อที่ไฟล์ต้นฉบับครอบคลุม – ทบทวนบทเรียนการเขียนโค้ดที่เรียนรู้ก่อนหน้านี้ทั้งหมดอย่างรวดเร็ว 6. เข้าถึงวิดีโอ Full HD 1080p ทั้งหมดโดยไม่มีโฆษณา 7. คอนโซล ตัวอย่างอินพุต – ตัวอย่างแบบโต้ตอบที่ทำให้เข้าใจและเรียนรู้การเขียนโค้ดได้ง่ายขึ้น 8. การเข้าถึง PHP Programming Book ที่อัปเดตโดย Clever Techie ดาวน์โหลดซอร์สโค้ดของวิดีโอนี้และไฟล์เพิ่มเติมที่นี่: “ “““““““ ““““““ ในบทช่วยสอน PHP CRUD นี้ เราจะสร้างแอปพลิเคชัน PHP CRUD ที่ทำงานได้อย่างสมบูรณ์ด้วย Bootstrap และ MySQL PHP CRUD ย่อมาจาก Create, Read, Update, Delete ซึ่งเป็นวิธีที่ง่ายในการจดจำส่วนประกอบทั้งหมดที่จำเป็นสำหรับแอปพลิเคชันเว็บไซต์ไดนามิกเต็มรูปแบบ เรากำลังจะใช้คำสั่ง MySQL ที่เรียกว่า INSERT, SELECT, UPDATE และ DELETE ซึ่งสอดคล้องกับฟังก์ชัน CRUD ..
https://brokengroundgame.com/ หวังว่าข้อมูลในบทความนี้จะมีคุณค่ามากสำหรับคุณ. ขอแสดงความนับถือ.
การค้นหาที่เกี่ยวข้องกับหัวข้อPHP CRUD Tutorial with MySQL & Bootstrap 4 (Create, Read, Update, Delete).
php crud
php crud,php crud tutorial,php crud with bootstrap,php crud tutorial mysql,php crud operation using mysqli,php crud application,php crud app,php crud with mysql
#PHP #CRUD #Tutorial #MySQL #amp #Bootstrap #Create #Read #Update #Delete
PHP CRUD Tutorial with MySQL & Bootstrap 4 (Create, Read, Update, Delete)
Fantastic tutorial. Pretty much as clear as it can get
when you push the button EDIT why it doesnt show the white screen? you dont have a header with location. so it must proceed to your script? it works like that for me so i dont get how to paste data into inputs. they are just empty
thanks u sir
i am on my third day in php and this is the best tutorial i have encountered
what if one of my data are drop down (option select from an input) i get the message parameters must be an array or an object that implements countable… help i tried is_array ($result) or —- and —- with && the countable are being ignored… im new to php… (this is the GET function to edit database)
$mysqli -> query("UPDATE data SET name=$name, location=$location WHERE id=$id ")or die(mysqli->error); this line doesn't work for me 🙁 here's the error:Uncaught Error: Undefined constant "mysqli" in
Thank you so much! 🙇🏻♂️
Nice work Sir !!! Very clear explanation. Keep it up !
Excellent work. I liked the way you put things in order and completed the List. Very good way of teaching! Thanks for sharing!
After redirecting it is not showing danger alert on index.php danger alert showing on index.php?delete=id page. Tell me some solution for this problem.
Best php CRUD tutorial!
I got a 500 Error from the <?php endwhile ?> , idk why
Hey Can I have source code for this please
i love your tutorials,… that was the best php lesson
This is so amazing! Beautifully explained. 🙂 Something weird happened to me though: The success-alert worked but the danger one didn't .. until I deleted "header('location: index.php');" … it redirected automatically and I don't understand why … any ideas?
merci beaucoup <<<3
Very neat and well organized, Good job saviour!
Hi .. anyone have this website.. I need php files and url .. today is last date in my final paper
can I ask why did you require the process.php before the action attribute. I understand why for the action attribute but why add it before also what will happen if you don't. Thank you
Which Notebooks do you use?
Thank you for sharing this info! Legit
Thanks a lot bruh
good
it didn't work for me !!!!
I dont understand, why you send the edit call to index.php and not to process.php?
Did anyone know how to edit/update if it is involve pdf file?
Merci pot c'etait tres interessant
link of bootstrap please
Fatal error: Uncaught TypeError: count(): Argument #1 ($var) must be of type Countable|array, string given in C:xampphtdocswagporocess_add.php:33 Stack trace: #0 C:xampphtdocswagad_location.php(16): require_once() #1 {main} thrown in C:xampphtdocswagporocess_add.php on line 33
Thank you for making this tutorial! This is very helpful for me 🙂
Thanks!
This is a good tutorial. I tried and it worked, except the line "If ( count($result) == 1) { "…. it throws out a error message that reads "Warning: count(): Parameter must be an array or an object that implements Countable in C:xampphtdocsdeleteprocess.php on line 37"…. I searched stackoverflow but still get no fix, can anyone help?
leo ?????
Thank you so muchhhhhhhhhhhhhhhhhhhhhhhhhhhhhhhhhhhhhhhh… you help me
🙏Thank you🙏
Getting warning: count():Parameter must be an array or an object that implements countable in C:… on line 42
How can get it not to show such?
There is an error in my fine after clicking edit button I'm getting data to my form, showing blank page
It is a bad practice to write a connect line to connect to the database on every file. The reason why you should not do it is because whenever you have to move the project from your localhost to the actual server, you will have to edit the database info on every file. It is better to have one single file connecting to the database and just include it whenever you need it. Then you can edit one single file when moving project to the server. But thanks for the video, I learnt a lot following up the steps!
Hey edit function is not working
Count() is not working
in minute 2 he write bshtml and he have the code how he does that?
I am having a error on connecting database step. plz guide
Warning: mysqli::__construct(): (HY000/1045): Access denied for user 'root'@'localhost' (using password: YES) in C:xampphtdocscrudprocess.php on line 3
easy to learn and understand code
easy to learn and understand code
I have warning in parameters how can I fix this?
Source code
https://mega.nz/file/9XgmCZKT#tnB1-2gUf6kUlBEQozWMpaq4qKLV99zRPbzYEHns2n0
Edit button not working when compared to video position-> 27:04 .
IDK but i literally had to copy the links word for word😅💔